
image viewer from scratch
this is one of my personal series where i go about exploring and writing daily simple software from scratch that we often take for granted.


Captured a cool photo, viewed it immediately on the photos/gallery app, isn’t it? How often do we pay heed to such a simple daily tool?
This is my first attempt at deconstructing and writing a simple image viewer from scratch. What does it do? Well, it takes our image of choice and renders it onto a screen.
what is an image?
To start off, let’s go with fundamentals. What is an image?
try out this experiment.
did you ever get too close to your old CRT television screen and saw weird red, green and blue bars? or maybe dropped water drops on your phone screen? if you looked at those water droplets that are acting as tiny magnifying glasses, you could actually see Red, Green & Blue pixels.

to put it bluntly, a file that consists of Red, Green, and Blue values along with Alpha values. When we mix RGBA ( Red Green Blue Alpha) values together we can form any color possible in the spectrum. Alpha value controls the transparency amount, more alpha means more transparency. This image file contains all the RGBA values for each and every individual pixel!
But there’s more to it, so many formats (png, jpeg, avif, webm, tiff, gif, ppm) how do they differ from each other?
formats like png, jpeg are densely compressed to allow as many pixel RBGA values possible for maximum color depth and quality.
to talk a bit more, PNGs are lossless, meaning that it specifically compresses data without causing a single change in the image quality or data. It follows a two-step process.
Filtering, which works by storing the difference between a pixel and it’s neighboring pixel RGBA values. For example, if there’s a blue color hex value that has similar value to its neighboring pixel, then the file records a 0 since there’s no difference. Then comes,
DEFLATE, which is a compression algorithm that is also used by .zip files. On a higher level it works by looking at repeating values/patterns across the file and replacing them with micro keys or codes.
if you want to read more in details, here’s a blog that talks more about it read more
understanding .PPM files.
before moving on, the last thing to understand are .PPM files, many aren’t familiar with this image format, but for our upcoming image viewer implementation we will use a .PPM file instead of png or jpeg. But why .PPM files?
Because .ppm files tend to be uncompressed so we will not have to work with decompression libraries or even writing one out by ourselves! Also, due to .PPM files’ format of storing data in raw binary format is quite easier to work with.
Let’s inspect what’s inside a .PPM file, using the linux command:
xxd image.ppm | headThe xxd command is a powerful utility used to create a hexadecimal dump of a file or standard input. It can also perform the reverse operation, converting a hex dump back into its original binary form (using flags such as -b). head command only display first few lines of the file instead of loading the entire file. ( try using tail tag too ).
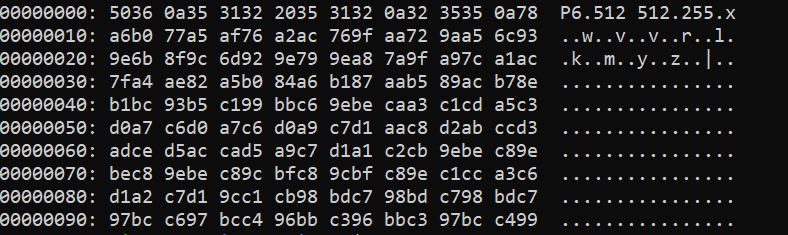
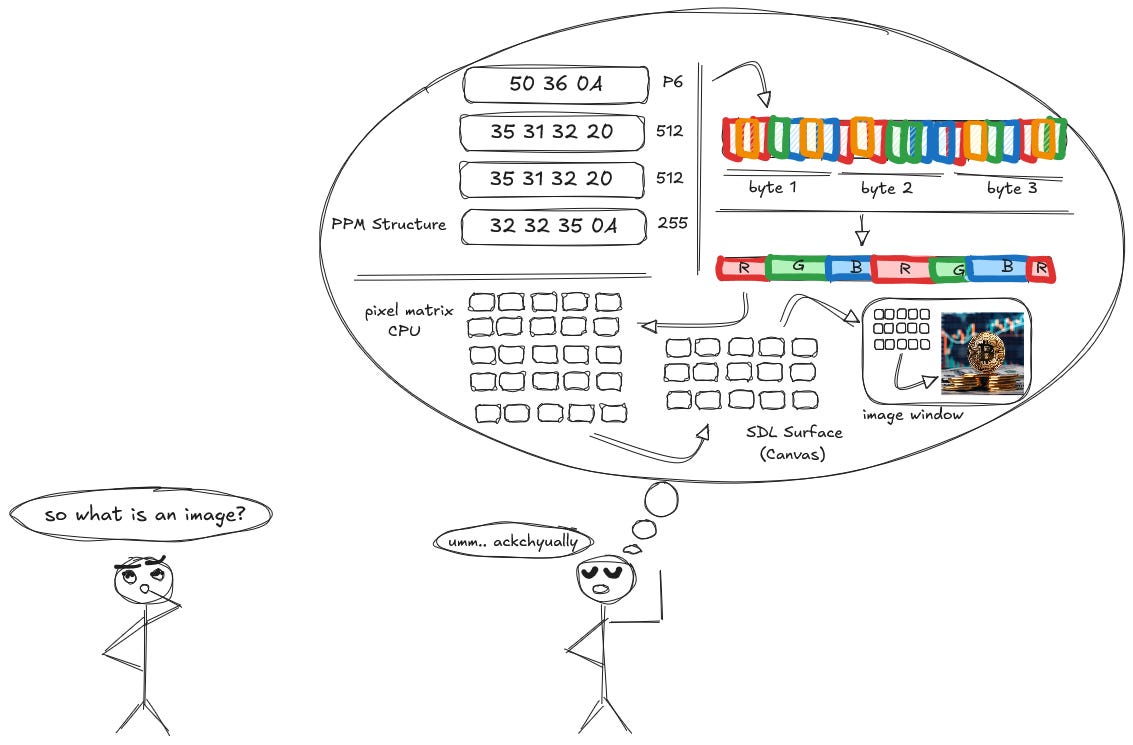
the image above is a few lines from a .ppm file’s data in hex values. Let’s understand what each of these line actually mean.
understanding hex/ascii relationship.
focus on the first 4 numbers from the sample image provided above:
5036 → This might seems intimidating or confusing but this is the Magic Number, a number that tells our computer “Hey I’m a PPM Image!”
math explanation.
when you convert 50 from hex to ascii code, it’s the letter P. But how? the answer is that if we convert hex value of 50 to decimal it’s 80 (5 * 16 + 0) then if we check the ascii table for value of 80 it’s actually the letter P. Similarly, for 36 the ascii code will be 6. For reference check this one out: ascii table.
So, 5036 refers to an ascii value of P6 which is the version of .ppm file we have, for reference:
P1 → PBM format (Black & White) Encoding: Plain Text Ascii
P2 → PGM format (Grey scale) Encoding: Plain Text Ascii
P3 → PPM format (Full Color) Encoding: Plain Text Ascii
P6 → PPM format (Full Color) Encoding: Raw Binary
so, once the image viewer reads that the .ppm file is a P6 version, it knows that the data that is encoded into the .ppm file is Raw Binary and not Plain Text Ascii.
What about the next hex values? 0A refers to newline and then the next 6 hex values → 353132 if we break them pairwise, then it’s 35, 31, 32 each hex value’s ascii value is nothing but 5, 1, 2 i.e 512 which is the image’s height and then we can notice a 20 hex value which refers to a empty space and then it’s 35, 31, 32 again, so its 512 which is the image’s width value!
It might seem confusing at first but with time you’ll get used to this hex / binary / decimal / ascii conversion if you follow the table reference provided above. So, we kinda got all the dimensional information needed to render our image, let’s keep reading the example hex values, we can see that there’s a 0A again which refers to newline, and then 323535 which again if we break pairwise, then it’s 32,35,35 whose ascii translation is 2,5,5 → 255. Now this refers to the maximum color value that the .PPM file has.
If we keep reading ahead then all the hex values are nothing but Red, Green & Blue values for each individual pixels of the image, so these are the exact information we need to draw our image.
Implementation.
Now moving onto implementation, i will be using C and it’s standard library with the only dependency being SDL2 which is a library that gives us low-level access to hardware ( window, keyboard, mouse, graphics etc ).
In case you want to revise or learn C: Beeg's Guide
why sdl2?
it’s one of the best well maintained and well abstracted library for graphics and hardware access also easier enough to get started within minutes, also not to mention the list of games that have been developed using SDL2! (fun fact: Valve uses SDL2 for their Source and Source2 Engines and other Clients)
for needing assistance regarding setting up visit: SDL2
(quick note: if you want to skip the SDL2 installation or if its too overwhelming, then follow the static linking tutorial, its the easiest and requires you to only install SDL2 via CLI and then use the command “g++ main.cpp -o myapp `sdl2-config --cflags --static-libs“ to compile your program, then if successful, run using “./your-program” and it should be running.
init.
#include <stdio.h>
#include <SDL2/SDL.h>

int main() {
  if (SDL_Init(SDL_INIT_VIDEO) != 0) {
    fprintf(stderr, "SDL init error!: %s\n", SDL_GetError());
    return 1;
  }
  return 0;
}
this is the starter code for our implementation, we used #include preprocessor directive to bring in stdio (standard input/output) and SDL2 from SDL.h which are the header files needed to get started.
We also start off by calling the SDL_Init method that takes in an SDL Flag which are basically special notations that allow us to tell the SDL system which of it’s features we will be using. Hence, we pass SDL_INIT_VIDEO flag.
Let’s start by creating a window and display it using SDL.
#include <stdio.h>
#include <SDL2/SDL.h>

#define WIDTH 800
#define HEIGHT 800

int main() {
    if (SDL_Init(SDL_INIT_VIDEO) != 0) {
    fprintf(stderr, "SDL init error!: %s\n", SDL_GetError());
    return 1;
   }

   SDL_Window* pwindow = SDL_CreateWindow("image viewer", SDL_WINDOWPOS_CENTERED, SDL_WINDOWPOS_CENTERED, HEIGHT, WIDTH, SDL_WINDOW_SHOWN);
   if (!pwindow) {
     fprintf(stderr, "window couldn't be created! : %s\n, SDL_GetError());
     SDL_Quit();
     return 1;
   }

    SDL_Delay(5000);

    SDL_DestroyWindow(pwindow);
    SDL_Quit();
    return 0;
}
we added two macros WIDTH and HEIGHT with the values 800, what does a macro do? and why not create an integer variable for height and width already?
well the answer lies on how macros are handled in C. Before compilation, during preprocessing, in the entire code base wherever WIDTH and HEIGHT are mentioned it will replace the values in its place, due to this, macros take up zero space unlike variables which are allocated a specific address in the memory.
SDL_CreateWindow is a method that takes in title, position of the window in x and y, height and width and a flag. SDL_CreateWindow returns a pointer of type SDL_Window. Also for flags, those are special variables which dictate how the newly created window will behave. Hence we used the flag SDL_WINDOW_SHOWN which as the name suggests, displays the window after initializing.
We also used SDL_DELAY which is a method that takes a millisecond value as it’s parameter, it halts the program for a set amount of time before the program exits. (the 5000 in the method is 5 seconds)
now compile this code using:
gcc -Wall -Wextra -g -o iv iv.c `sdl2-config --cflags --libs`now, if there’s no error, then we can see that in the directory there’s a binary file with the name “iv”, run it from the cli using:
./ivif you followed everything, then it should display a black window with the title “image viewer” for 5 seconds before the program terminates.
rgb mapping.
Before moving into more code implementation, let’s get sidetracked and create a Rectangle on our screen. To render a rectangle onto the screen, we need to create a Surface. A Surface is essentially the entire canvas of our application ( a canvas is where we can draw or render anything we want to. )
SDL_Surface* psurface = SDL_GetWindowSurface(pwindow);SDL_GetWindowSurface takes in our newly created window and returns a pointer to the window’s surface (canvas) for us to interact with. Now onto creating a Rectangle and drawing it onto our surface.
firstly, let’s get to creating a color for our rectangle, white is a good choice.
#define WHITE 0xffffffwe create a macro named White that stores the hex value of 0xffffff which in decimals translates to (255, 255, 255) which in RGB terms is the white color indeed! for reference: Hex color values
SDL_Rect rectforsurface = (SDL_Rect) {10, 10, 10, 10};
SDL_FillRect(psurface, &rectforsurface, WHITE);
here, we create a SDL_Rect value that stores 4 things:
X position
Y position
Width
Height
We then use the SDL_Rect variable rectforsurface and use it to pass into another SDL method SDL_FillRect which as the name suggests, takes in a reference to an SDL_Rect value and renders it onto our surface. for more info: SDL_Rect docs
follow the steps and then re-compile and run again, you should be seeing something this like:

pretty cool isn’t it? there’s another way to initialize colors in SDL, using the SDL_MapRGB method, which takes in 4 things, pixel format, red, green and blue hex values.
what is a pixel format? as per my understanding it means the format based on the surface we will be drawing this color on. Since our surface is psurface so we pass psurface’s format.
Uint8 r = 0x1A;
Uint8 g = b = 0x22;
Uint8 color = SDL_MapRGB(psurface->format, r, g, b);
we set some random hex values for r,g,b and proceed to pass them to SDL_MapRGB, now we can use this color variable anywhere just like the macro variable WHITE we set earlier.
i/o with files.
reading the .PPM files and extracting hex value data out of it is our main objective for now, so we do the following:
#include <stdio.h>
#include <SDL2/SDL.h>

#define WIDTH 800
#define HEIGHT 800

//int main() {
   // if (SDL_Init(SDL_INIT_VIDEO) != 0) {
   // fprintf(stderr, "SDL init error!: %s\n", SDL_GetError());
   // return 1;
   //}

  FILE *in = stdin;
  char *pthrowaway = calloc(1000, sizeof(char));
  fgets(pthrowaway, 1000, in);

  free(pthrowaway);

  char *pdimensions = calloc(1000, sizeof(char));
  fgets(pdimensions, 1000, in);

  int width = -1;
  int height = -1;

  sscanf(pdimensions, "%d %d\n", &width, &height);
  free(pdimensions);
  printf("the dimensions are: height=%d and width=%d\n",height, width);


   //SDL_Window* pwindow = SDL_CreateWindow("image viewer", SDL_WINDOWPOS_CENTERED, SDL_WINDOWPOS_CENTERED, HEIGHT, WIDTH, SDL_WINDOW_SHOWN);
   //if (!pwindow) {
     //fprintf(stderr, "window couldn't be created! : %s\n, SDL_GetError());
     //SDL_Quit();
     //return 1;
  // }

   //SDL_Delay(5000);

  //return 0;
}
I commented out the unimportant parts of the code so that we don’t get confused. Let’s go over with each line and what they do.
nothing-burger statements.
FILE *in = stdin;
starting off with FILE type, it’s a highly abstracted type in C, in simple terms, C treats almost everything as a FILE type that has standard input and output stream. It can be an .md, .txt, .html, .ppm, .csv or any streamable files.
stdin is essentially, whatever file we open as an input to our code. it’s more easier to grasp later when we run our code with an .PPM image file.
for now, in is the variable that has entire contents of the opened .PPM file.
char *pthrowaway = calloc(1000, sizeof(char));
fgets(pthrowaway, 1000, in);
free(throwaway);
pthrowaway is a pointer to an address of an array with size of 1000 elements, each being a char (or size of a char i.e 1byte). But pthrowaway as the name suggests, is just a throwaway variable that has no use, the reason is because we already know that the first line is P6 and now it has no use for us. So, we simply use fgets to get the first line from in (the contents of .PPM file) which has the P6 ascii value.
Ultimately, we free pthrowaway since it’s of no use of us and then we get to the next crucial part.
retrieving height & width of our image.
char *pdimensions = calloc(1000, sizeof(char));
fgets(pdimensions, 1000, in);

int width = -1;
int height = -1;

sscanf(pdimensions, "%d %d\n", &width, &height);
free(pdimensions);
printf("the dimensions are: height=%d and width=%d\n",height, width);

char* pmaxColorVal = calloc(1000, sizeof(char));
fgets(pmaxColorVal, 1000, in);
similar to the pthrowaway variable, we again initialize a pointer variable pdimensions with memory allocated for a size of 1000 char bytes. We use fgets and retrieve the second line of our .PPM file which consists of width and height of the image.
we initialize variables width and height to -1 since we need to dynamically set size of our window based on the .PPM image’s dimensions. Following up we use sscanf which is similar to scanf except it doesn’t wait for the user input like scanf and takes an existing string and extracts data from it. So, we pass reference to width and height variable for it to store them. Ultimately, after fetching dimensions, we free pdimensions up since we don’t want to deal with pesky memory and OOM bugs!
just like pdimensions, we also get the maximum color value for the .PPM image, which is generally 255, but since we have no use for such information we decided to skip it, and free the pmaxColorVal pointer variable.
sscanf() reads from the string and interprets it according to the specified format . Any whitespace in the format string matches any whitespace in the input string.
we can now, modify the SDL_Window* pwindow variable to take in the width and height variable instead of the earlier macro variable WIDTH and HEIGHT.
SDL_Window* pwindow = SDL_CreateWindow("image viewer", SDL_WINDOWPOS_CENTERED, SDL_WINDOWPOS_CENTERED, height, width, SDL_WINDOW_SHOWN);draw pixels!
Here’s how we will apply brute-force to draw our image,
create a pixel (rectangle) with x,y,height,width
map it’s color using SDL_MapRGB after parsing the .PPM file for RGB hex values.
loop the height and width to fetch each individual pixel RGB value of the .PPM file and draw it on the screen.
It isn’t optimized but it does the job for now. We can talk in another blog about improved techniques that use the GPU renderer instead of CPU to draw more detailed and larger images in millisecond time!
SDL_Rect pixel = (SDL_Rect){0,0,1,1};

for(int y = 0; y < height; y++) {
  for(int x = 0; x < width; x++) {
    Uint8 r,g,b;
    r = (Uint8) getchar();
    g = (Uint8) getchar();
    b = (Uint8) getchar();

    color = SDL_MapRGB(psurface->format, r,g,b);
    pixel.x = x;
    pixel.y = y;
    SDL_FillRect(psurface, &pixel, color);
  }
}
here, we loop for each individual pixel of our image starting off from 0 to height value (eg: 512) and a nested loop for width (eg: 512), we then pick up each byte from the .PPM file (binary values) and then getchar will take this binary value and convert it to appropriate Uint8 value (0-255). Thus, we obtain the R, G & B values.
We pass these values onto SDL_MapRGB like earlier example and create the color of a single pixel in each iteration of the loop! Now, using the iterators x & y, we set the x & y position values of the pixel to it.
Finally, we use SDL_FillRect to paint the pixel onto the surface. Thus, a single pixel of our .PPM image has been painted onto our canvas. This keeps happening until the loop is over and our image gets entirely painted onto the canvas.
while getchar() works, it is technically slow for large images. Each call to getchar() is a function that requires overhead. For a 512x512 image, we make approximately 786,000 function calls to read pixels! Optimization topic is for another day.
output.
finally, we can compile our code and run it with a .PPM file!
gcc -Wall -Wextra -g -o iv iv.c `sdl2-config --cflags --libs`now, to run our program, we need to pass a .PPM file into our stdin (standard input). To do so, we first have to locate our .PPM file ( ensure the .ppm file is in the same directory as the source code ) and then use the cat command which is used for reading entire contents of the specified file.
cat image.ppm | ./ivthis command uses cat to open and read the contents of image.ppm which is then passed to stdin and then we use the piping command (“ | “) to run our compiled binary. If everything is right, then the .PPM image will be rendered onto our image viewer application that is currently capable of displaying any .PPM images!

epilogue.
Looks like we were able to successfully parse a random .PPM file and display it’s pixel values onto our image viewer application. The current implementation is extreme brute-force with notably too many function calls and using CPU to draw pixels instead of GPU renderer. It also lacks all the basic features that an image viewer or editing softwares tend to have. Sometime soon I’ll work on another part of this image viewer series with extending this with added tools and features or optimization techniques, or even rendering PNGs or JPEGs via decompression.
There might be too much to grasp at a time, read it again, go through the references i put, and google as much as possible. Next upcoming blog is gonna be a smaller one, it’s based on 3D projection!
the source code for this is available at: source code
complaints on misintepretations, mistakes or bugs are highly appreciated.
a list of sites i visited while tinkering around this project and while writing this blog:
Good stuff 🙌🏽